In the last year, Freescale has revamped their ARM Cortex-M development platform. Previously just an Eclipse plugin, it has been upgraded into its own standalone platform, dubbed "Kinetis Design Studio," that comes with a whole slew of sweet features for embedded development. In addition to the Design Studio, Freescale has also created a handy software development kit to make it even easier to get your ideas rolling on hardware. It's compatible with every Kinetis board Freescale makes, and can get your hardware protoype up and running within an afternoon!
What You'll Need
- An account here - You'll need it to download both of the software packages we'll be using here. It's totally free to register!
- A download of Kinetis Design Studio - Once you've created your Freescale account, you need to download and install Kinetis Design Studio. I'll be showing some screenshots from KDS on my personal machine, which happens to be a Mac, but the Windows distribution isn't terribly different. This article uses KDS v3.0.0, which you can download here. (Note: you'll need to be logged into Freescale's webpage for this to work.)
- A download of Kinetis Software Development Kit - While you're still logged into your Freescale account, you'll need to download the Kinetis SDK as well. You can find that at this link (also only works if you're logged into Freescale's page).
- A Freescale Kinetis Development Board - I'm using the Freescale FRDM-K22F, but just about any of the Freescale Kinetis boards will work with this example - you just have to remember to swap out the build files shown in later sections for the appropriate board/processor. I'll do my best to make it abundantly clear when you need to pay attention to this!
- A Segger J-Link EDU Debugger (Mac OS only) - OpenSDA, the embedded bootloader software that Freescale includes with their dev boards, does not currently have drivers available for Mac OS X. Not to worry, however! All you'll need is a Segger J-Link EDU debugger, which is available online for about $60. It's a very nice piece of debug hardware, and has a ton of uses besides programming boards, but we'll get into those later!
The goal of this piece is to show you how to get Kinetis Design Studio and Kinetis SDK playing nicely together. By the end of the article, you should have a working toolchain, and a simple program running on a Kinetis board!
At Your Local Library...
Before we start writing any code, we'll need to get the Kinetis Design Studio toolchain up, running, and playing nicely with the SDK. The first thing you'll need to do is build you platform specific linker library. The guide to do this is included with Kinetis SDK: navigate to your install directory to the path `//KSDK_1.2.0/doc/`, and look for the file "Getting Started With Kinetis SDK". Follow the instructions from section 5.3, entitled "Build the Platform Library". This will build the linker library - we'll need it later in this article!
Total Eclipse from the Start
As I mentioned earlier, Kinetis Design Studio is really just Freescale's version of the Eclipse IDE. To get it playing nicely with Freescale's SDK, we have to install a patch to let KDS know that we have the kit installed on our machine. That patch is stored in the bowels of the SDK filesystem, in `/tools/eclipse_update/`. There will be a .zip file titled "KSDK_1.2.0_Eclipse_Update.zip". You will need to feed this to Kinetis Studio through the "Install New Software" utility, which is located under the "Help" dropdown menu.
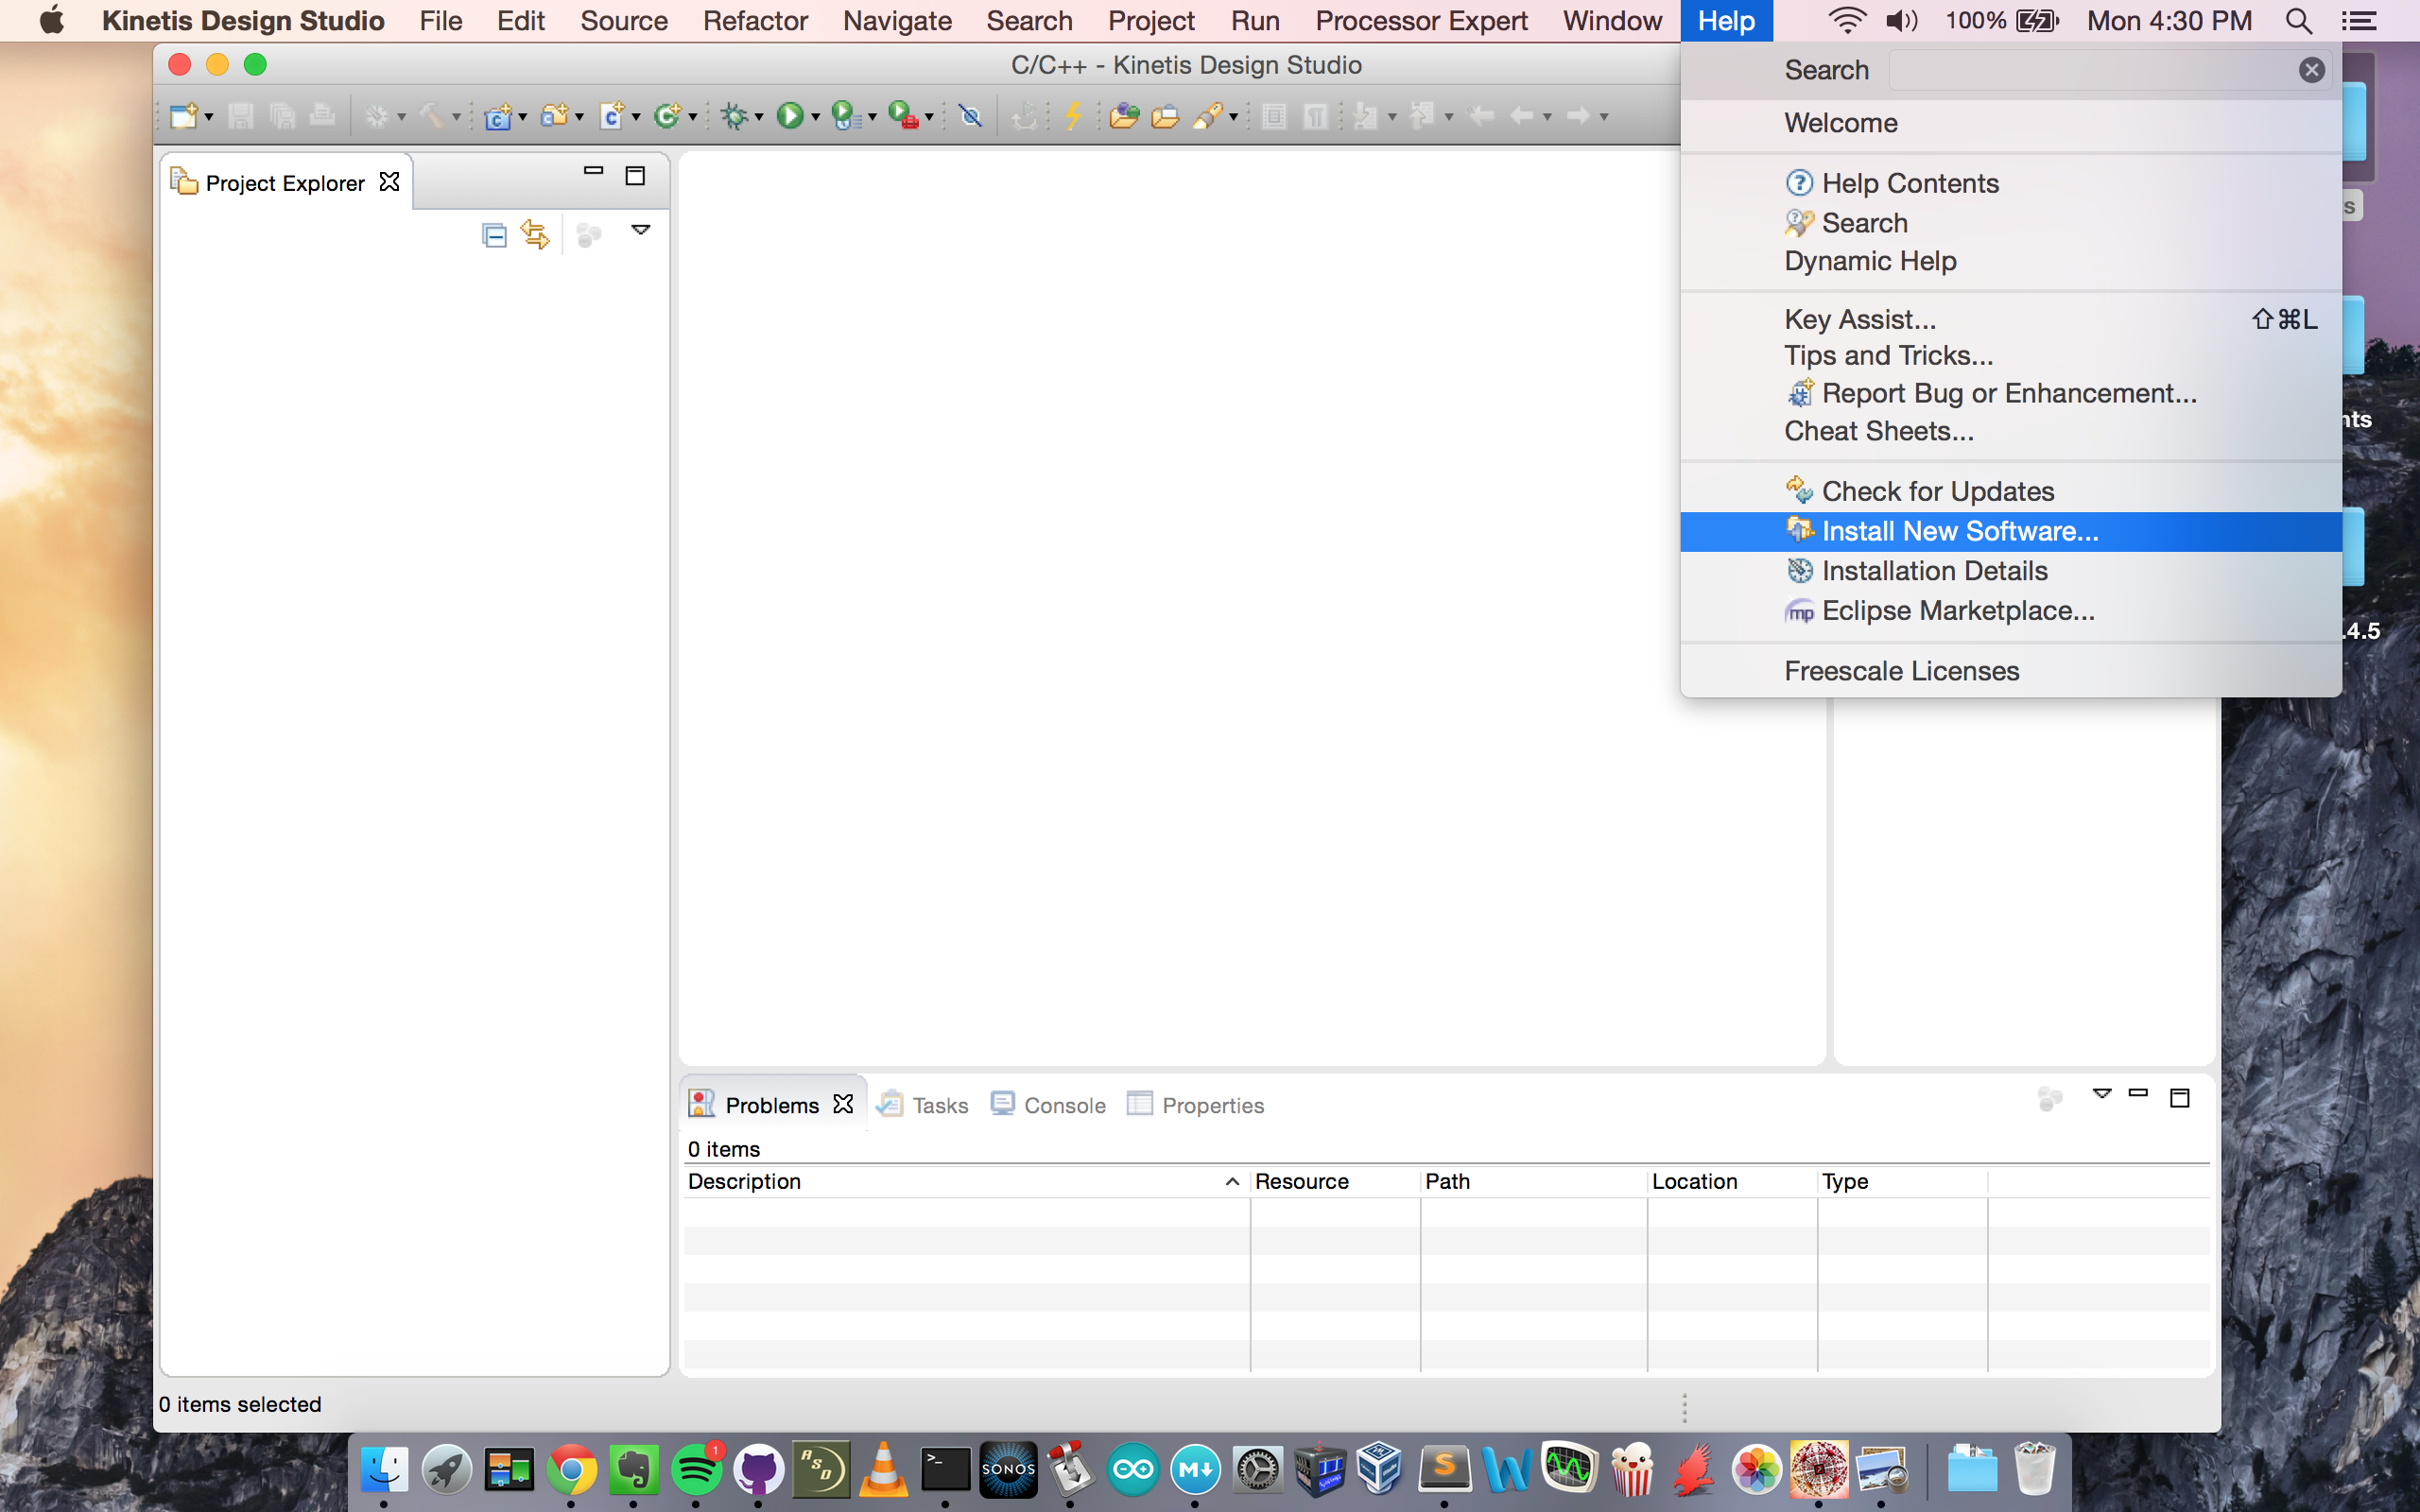
Once the "Install New Software" window is open, click the "Add" button, then the "Archive" button on the resulting popup. Navigate to the correct zip file, select it, and click "OK". You'll be back at the "Install New Software" pane at this point, and "KSDK 1.2.0 Eclipse Update" should be in the "Available Software" box.
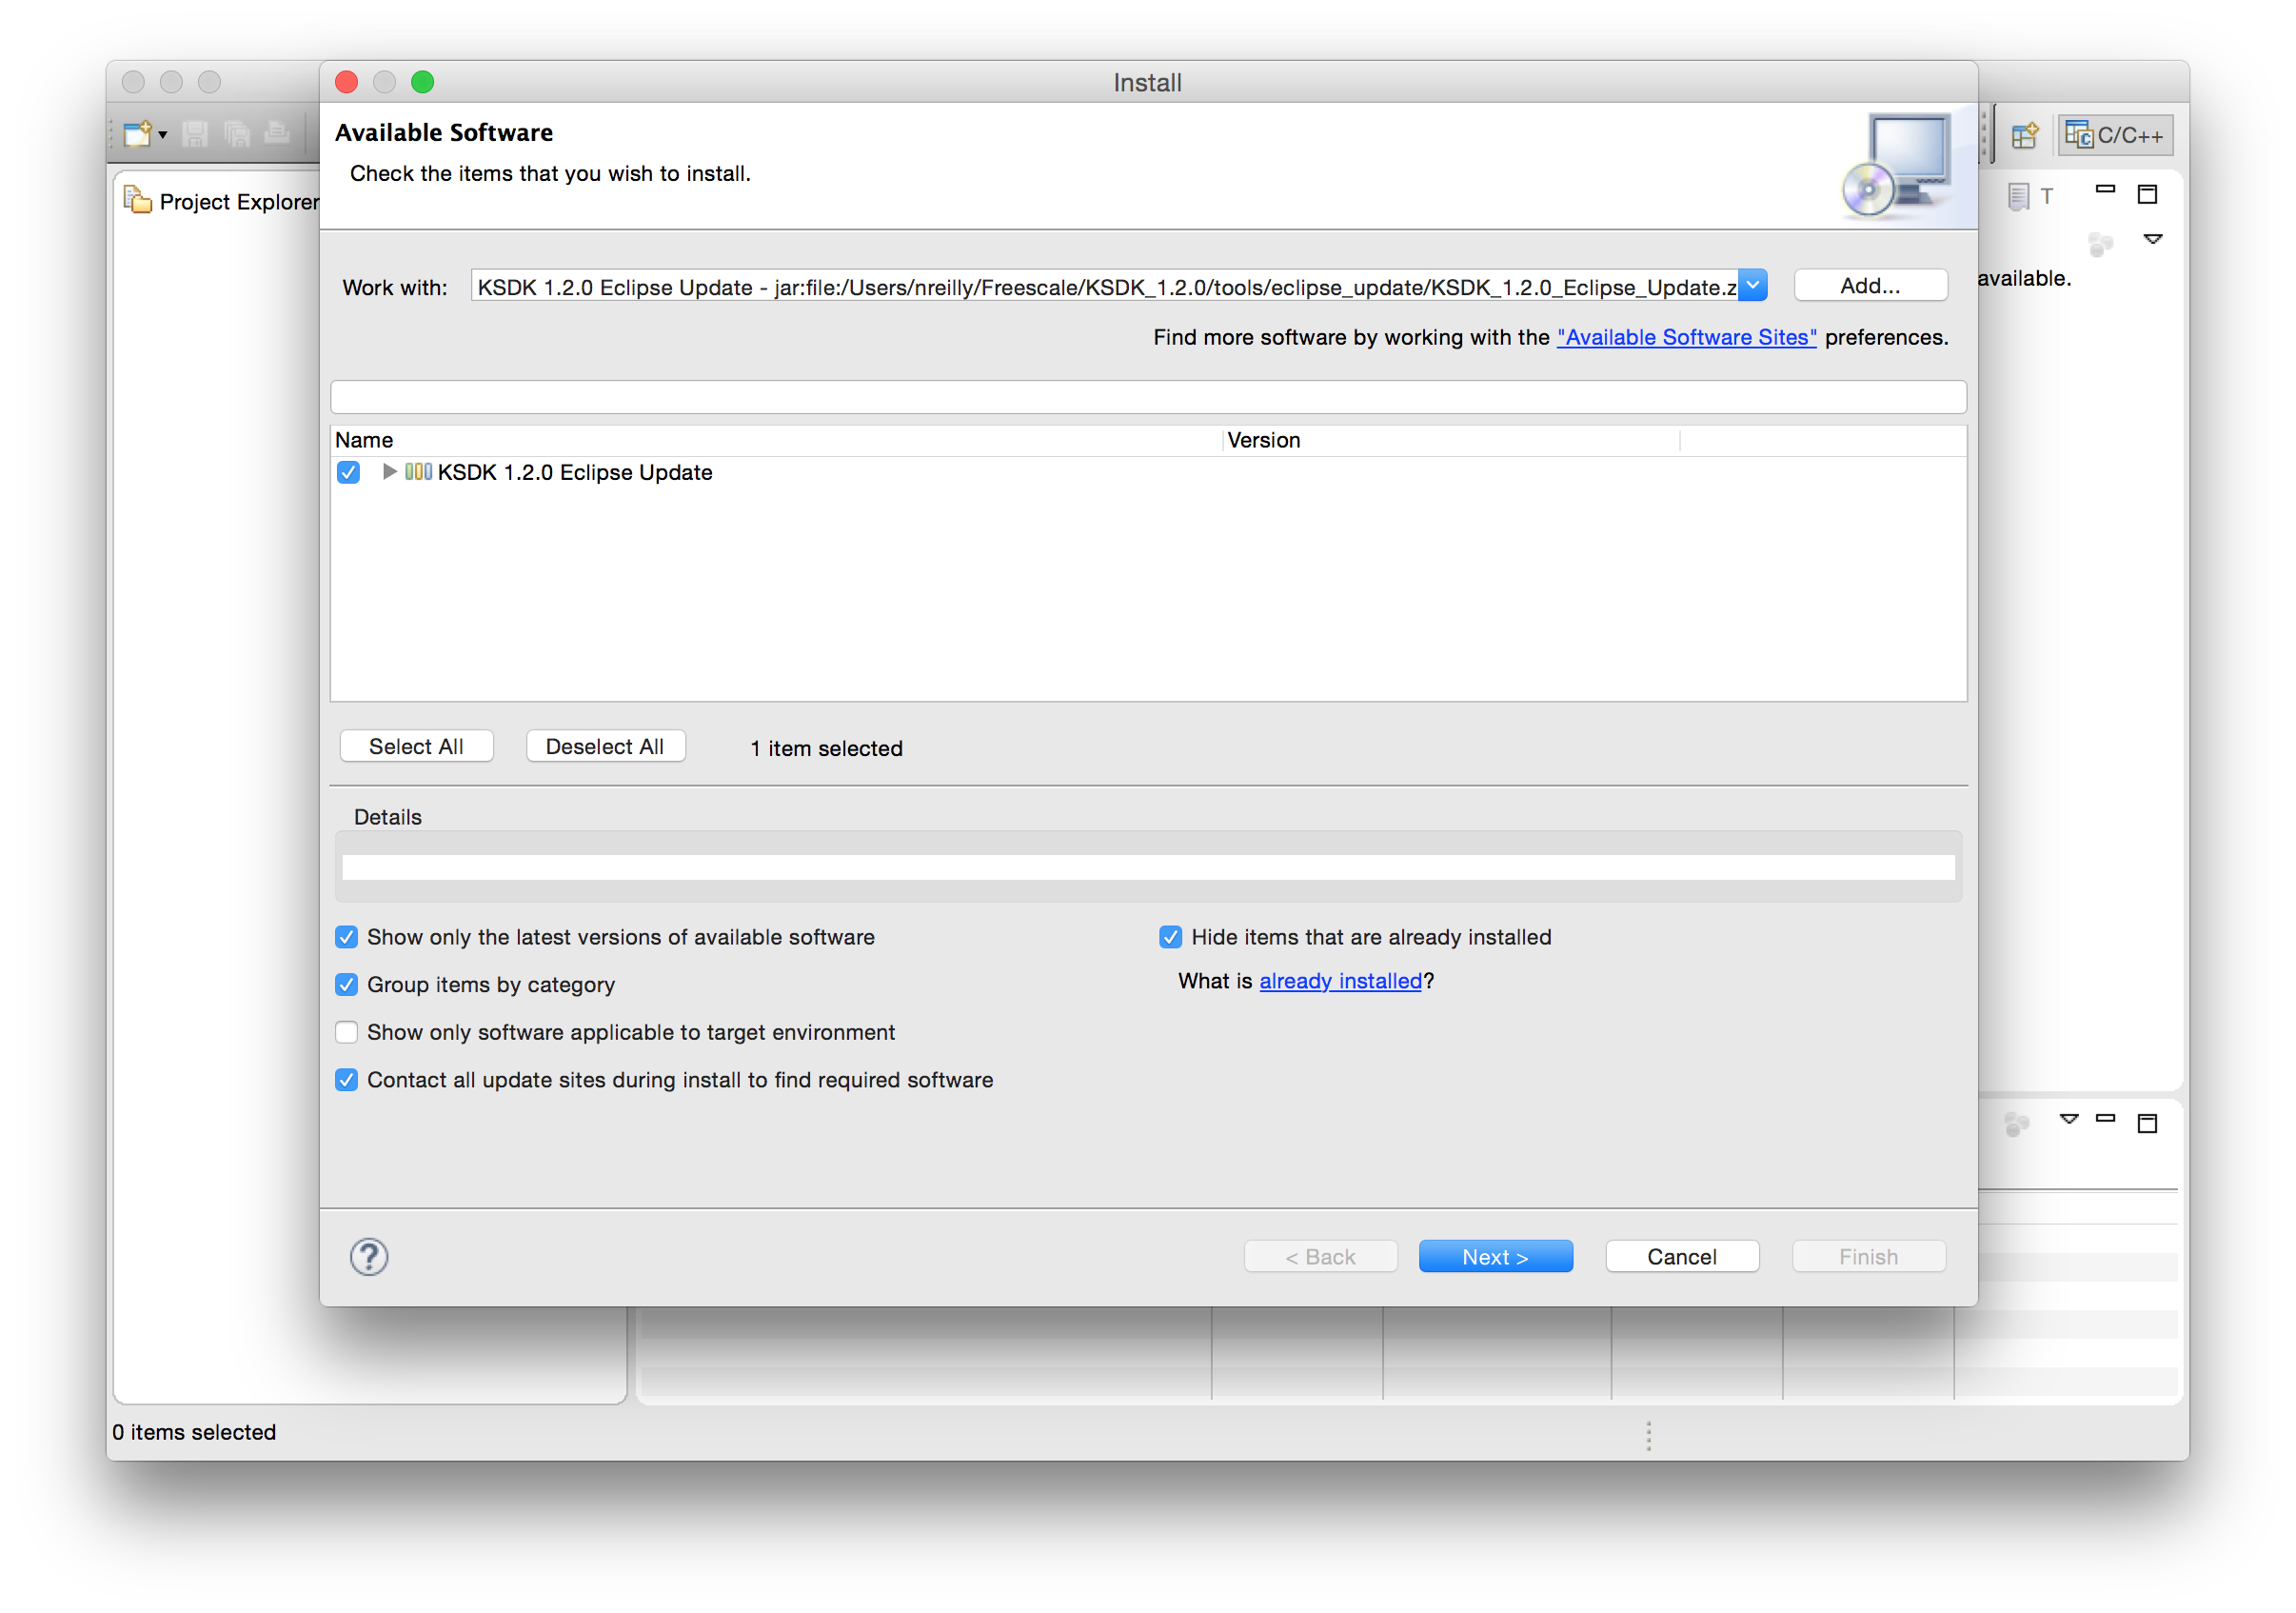
Click the checkbox next to it, and then select "Next". Click "Next" through the following screens, and then click "Finish" to start the patching process. Once the patch is complete, you will get a prompt asking you to restart the Kinetis Suite. Click "yes", and the software will bring you back to the main Kinetis Studio window.
The Setup
Alright! Now that we're back on the main tab, or "Workbench", we can start getting our build environment ready! Click on the "File" dropdown menu, and select "New > Kinetis Project". Name it whatever you like (I'm calling mine "blink"), and click the "Next" button. This will bring you to the Device selection pane. Select the board you're using from the list or using the search bar, and then click "Next".
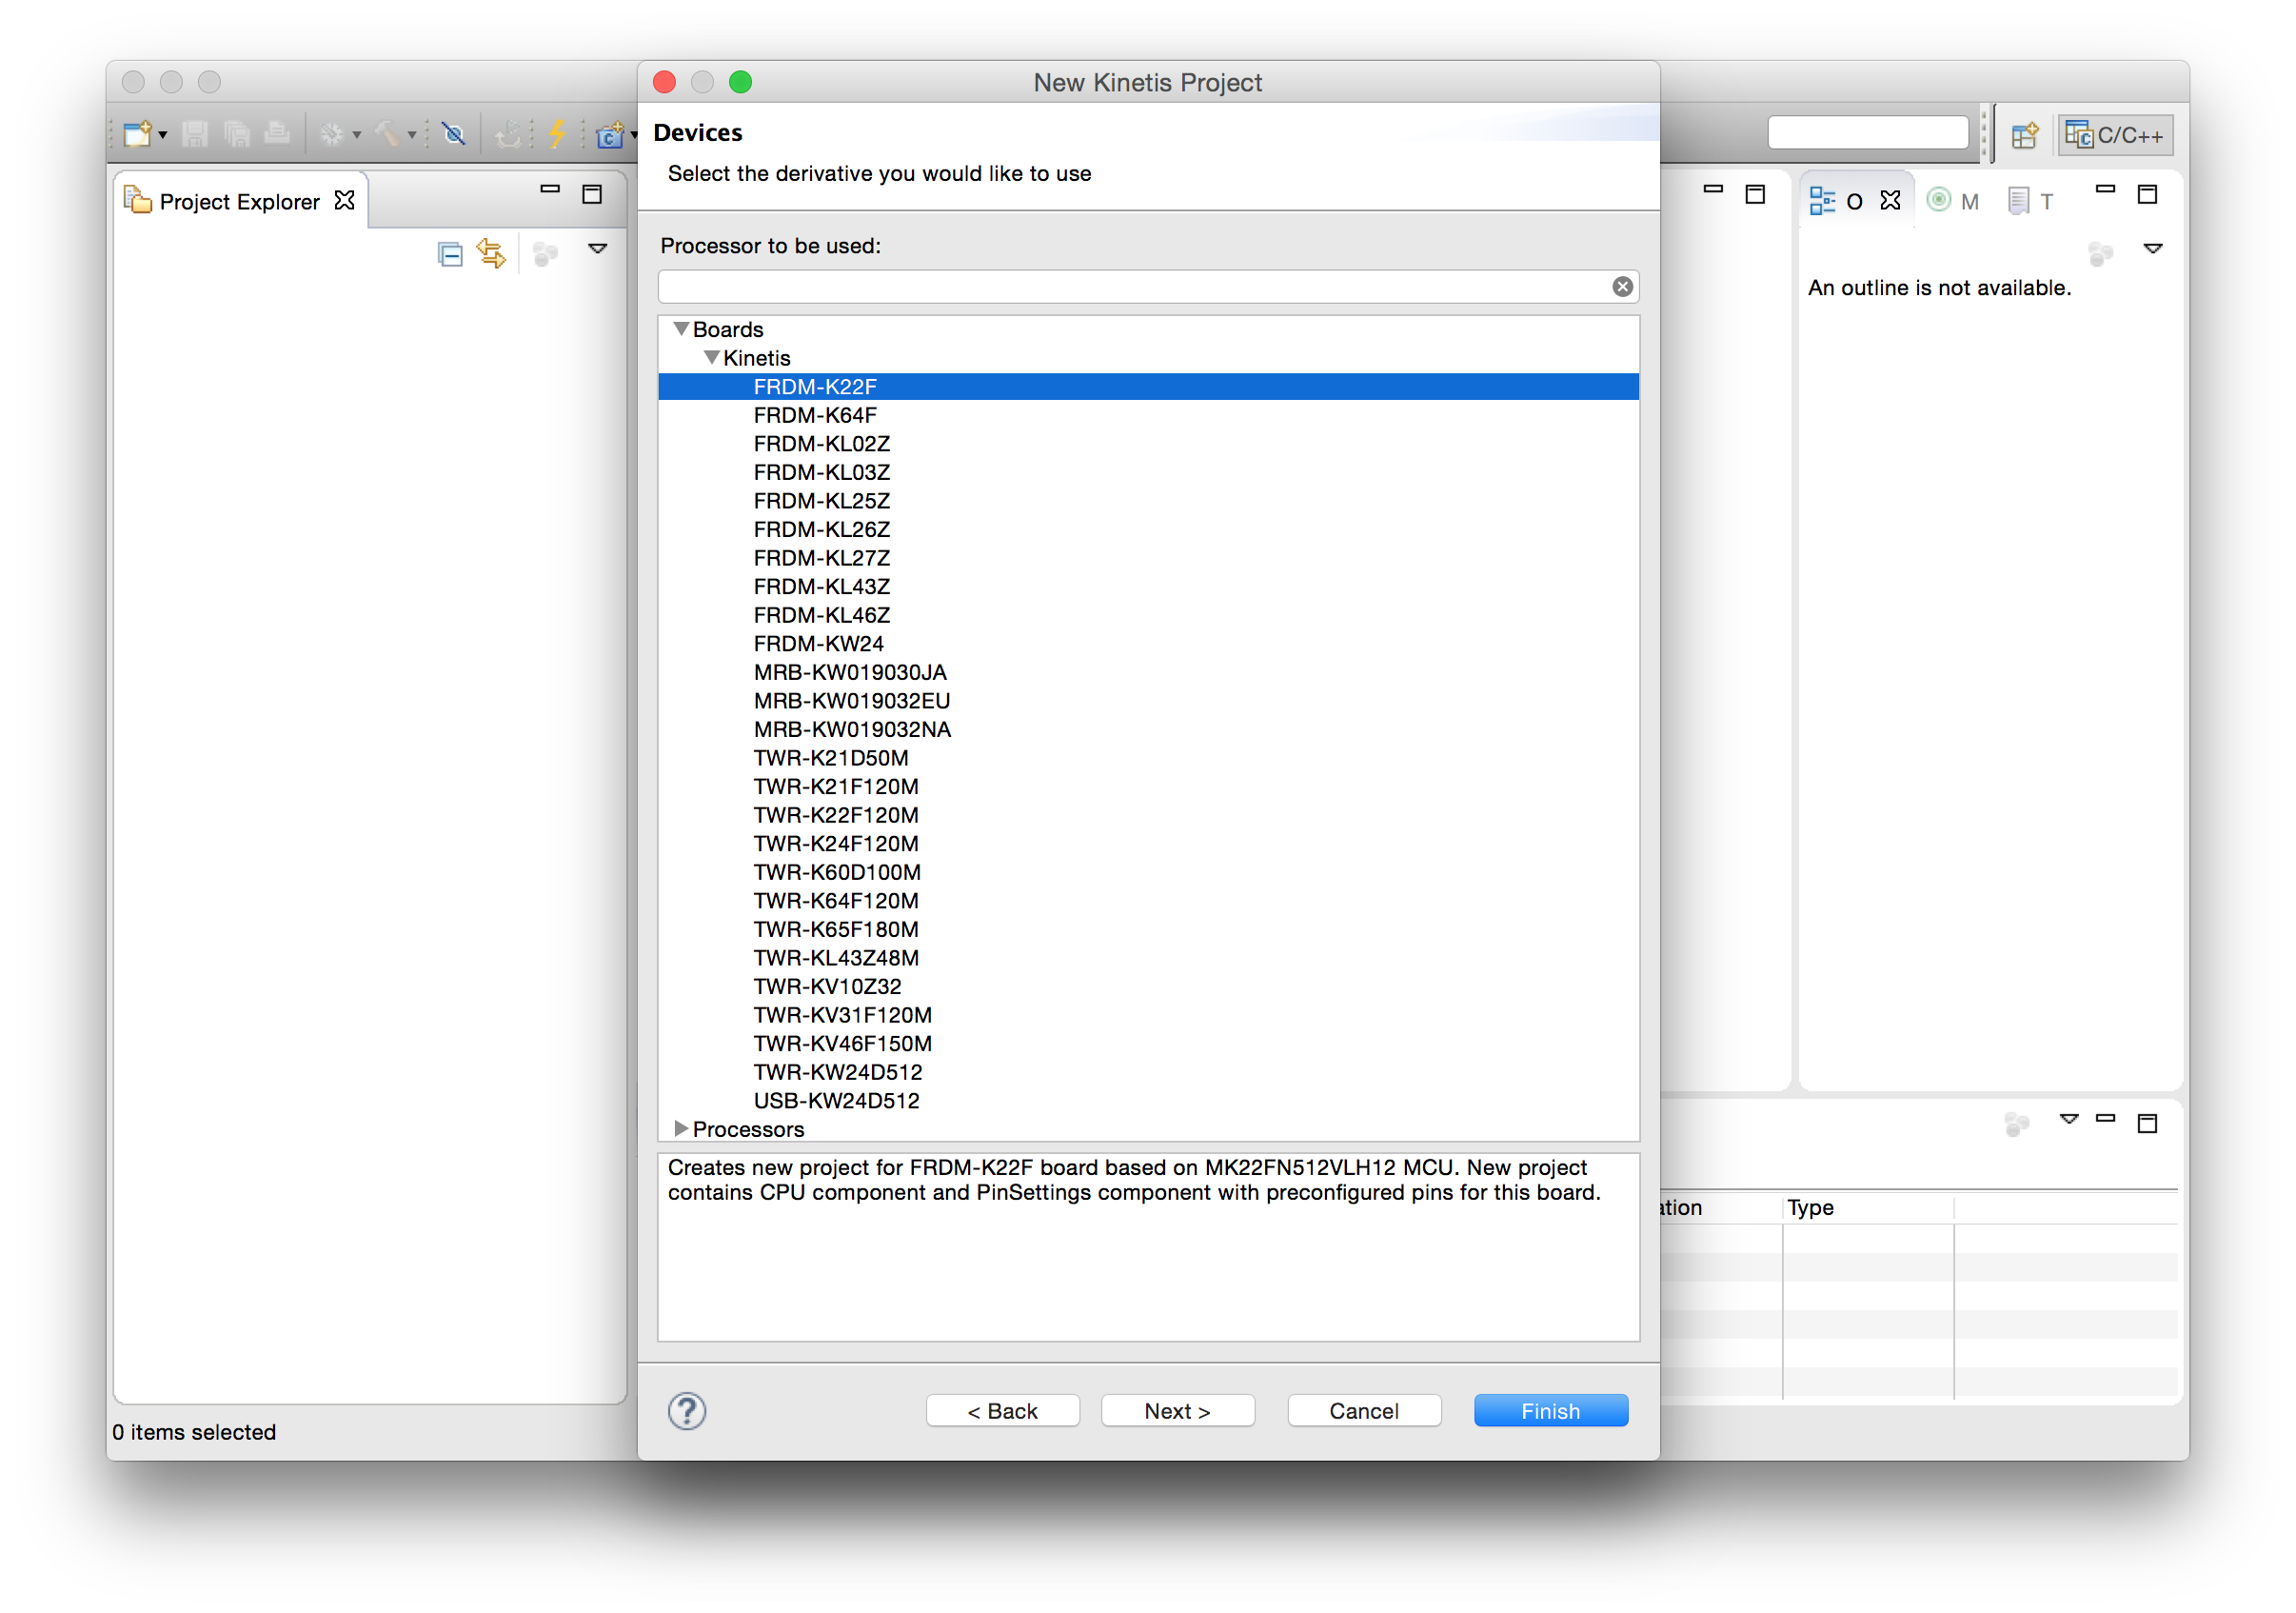
Double check the board you are using. I'm using the FRDM-K22F board, but if yours is different, make sure you select the correct one from the dropdown!
The next menu allows you to specify what rapid development environment you are using. Since we installed Kinetis SDK, and patched Kinetis Studio to recognize that, Kinetis SDK should be the default option. (If you don't see Kinetis SDK as the default option, try rerunning the patch from the "Help > Install New Software" menu.) Double check that the absolute path to the "Freescale/KSDK_1.2.0" folder is correct, and then click "Finish". This will build up a nice project directory for you, with links to all of the proper toolchain utilites, header files, and startup code for your target processor.
Use Your Head(ers)!
Now that we've got a project folder rolling, we can set up the local project headers needed to link code to our target Freescale board. Right click on the "Sources" folder in the "Project Explorer" pane, and select "New > Folder". This is where we'll store Kinetis SDK's board-specific headers in our project. You can find these headers in `/KSDK_1.2.0/examples/`. For me, `board_id` is `frdmk22f`. Remember - if you are using a different board, choose the folder that corresponds to your board! Be sure to grab all of the files with a .c or .h extension in this folder. Once you've copied these into your project, you should have a folder in the "Project Explorer" pane of Kinetis Studio with the following files in it:
- pin_mux.c
- pin_mux.h
- gpio_pins.c
- gpio_pins.h
- board.c
- board.h
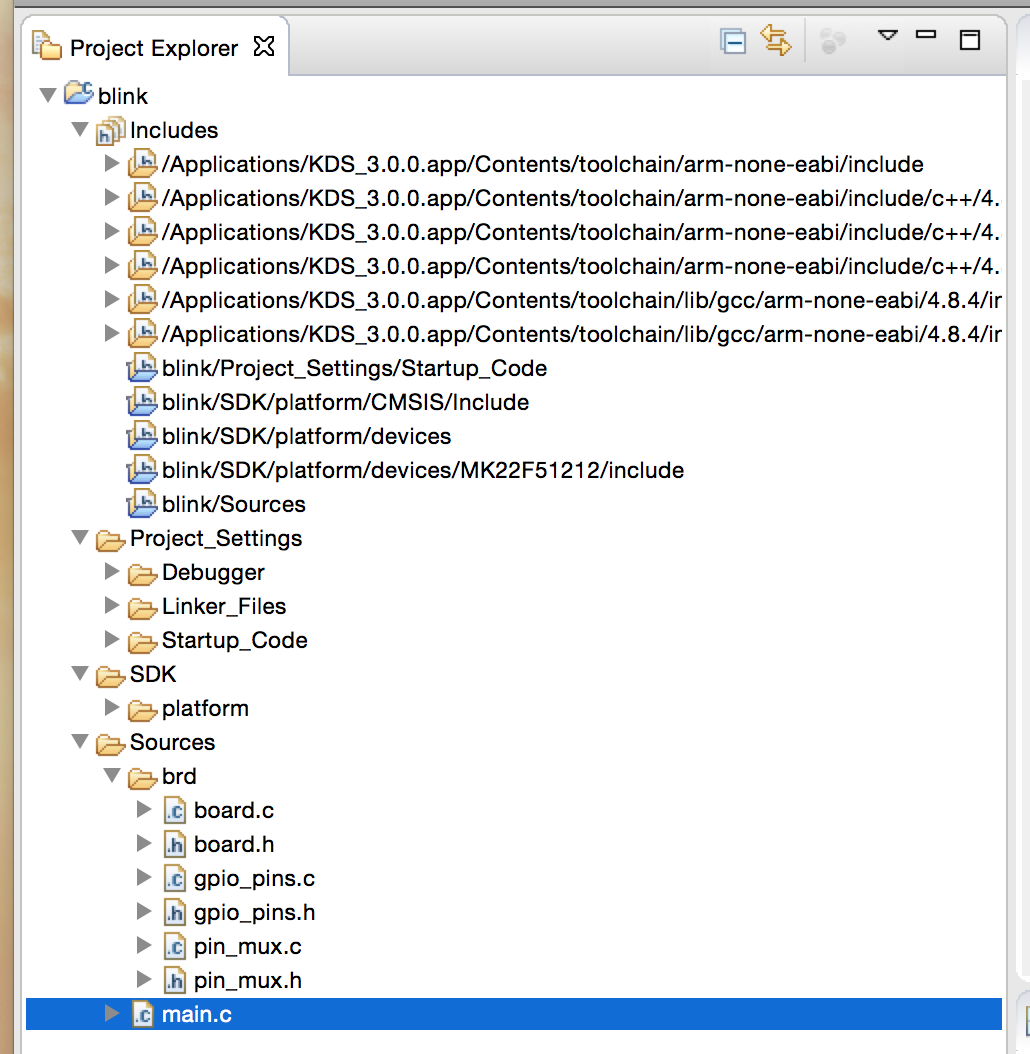
In addition to our `brd` folder, we want to create another folder, titled `util`. This is where we'll store a software defined UART connection used for debug purposes. Create the `util` folder the same way you created the `brd` folder, and then navigate to `//KSDK_1.2.0/platform/utilities/inc`. From this folder, copy the file `fsl_debug_console.h` into your new `util` file. After this is done, navigate to `//KSDK_1.2.0/platform/utilities/src`, and repeat the process of copying `fsl_debug_console.c` to your local `util` folder.
Never Break The (Tool)Chain
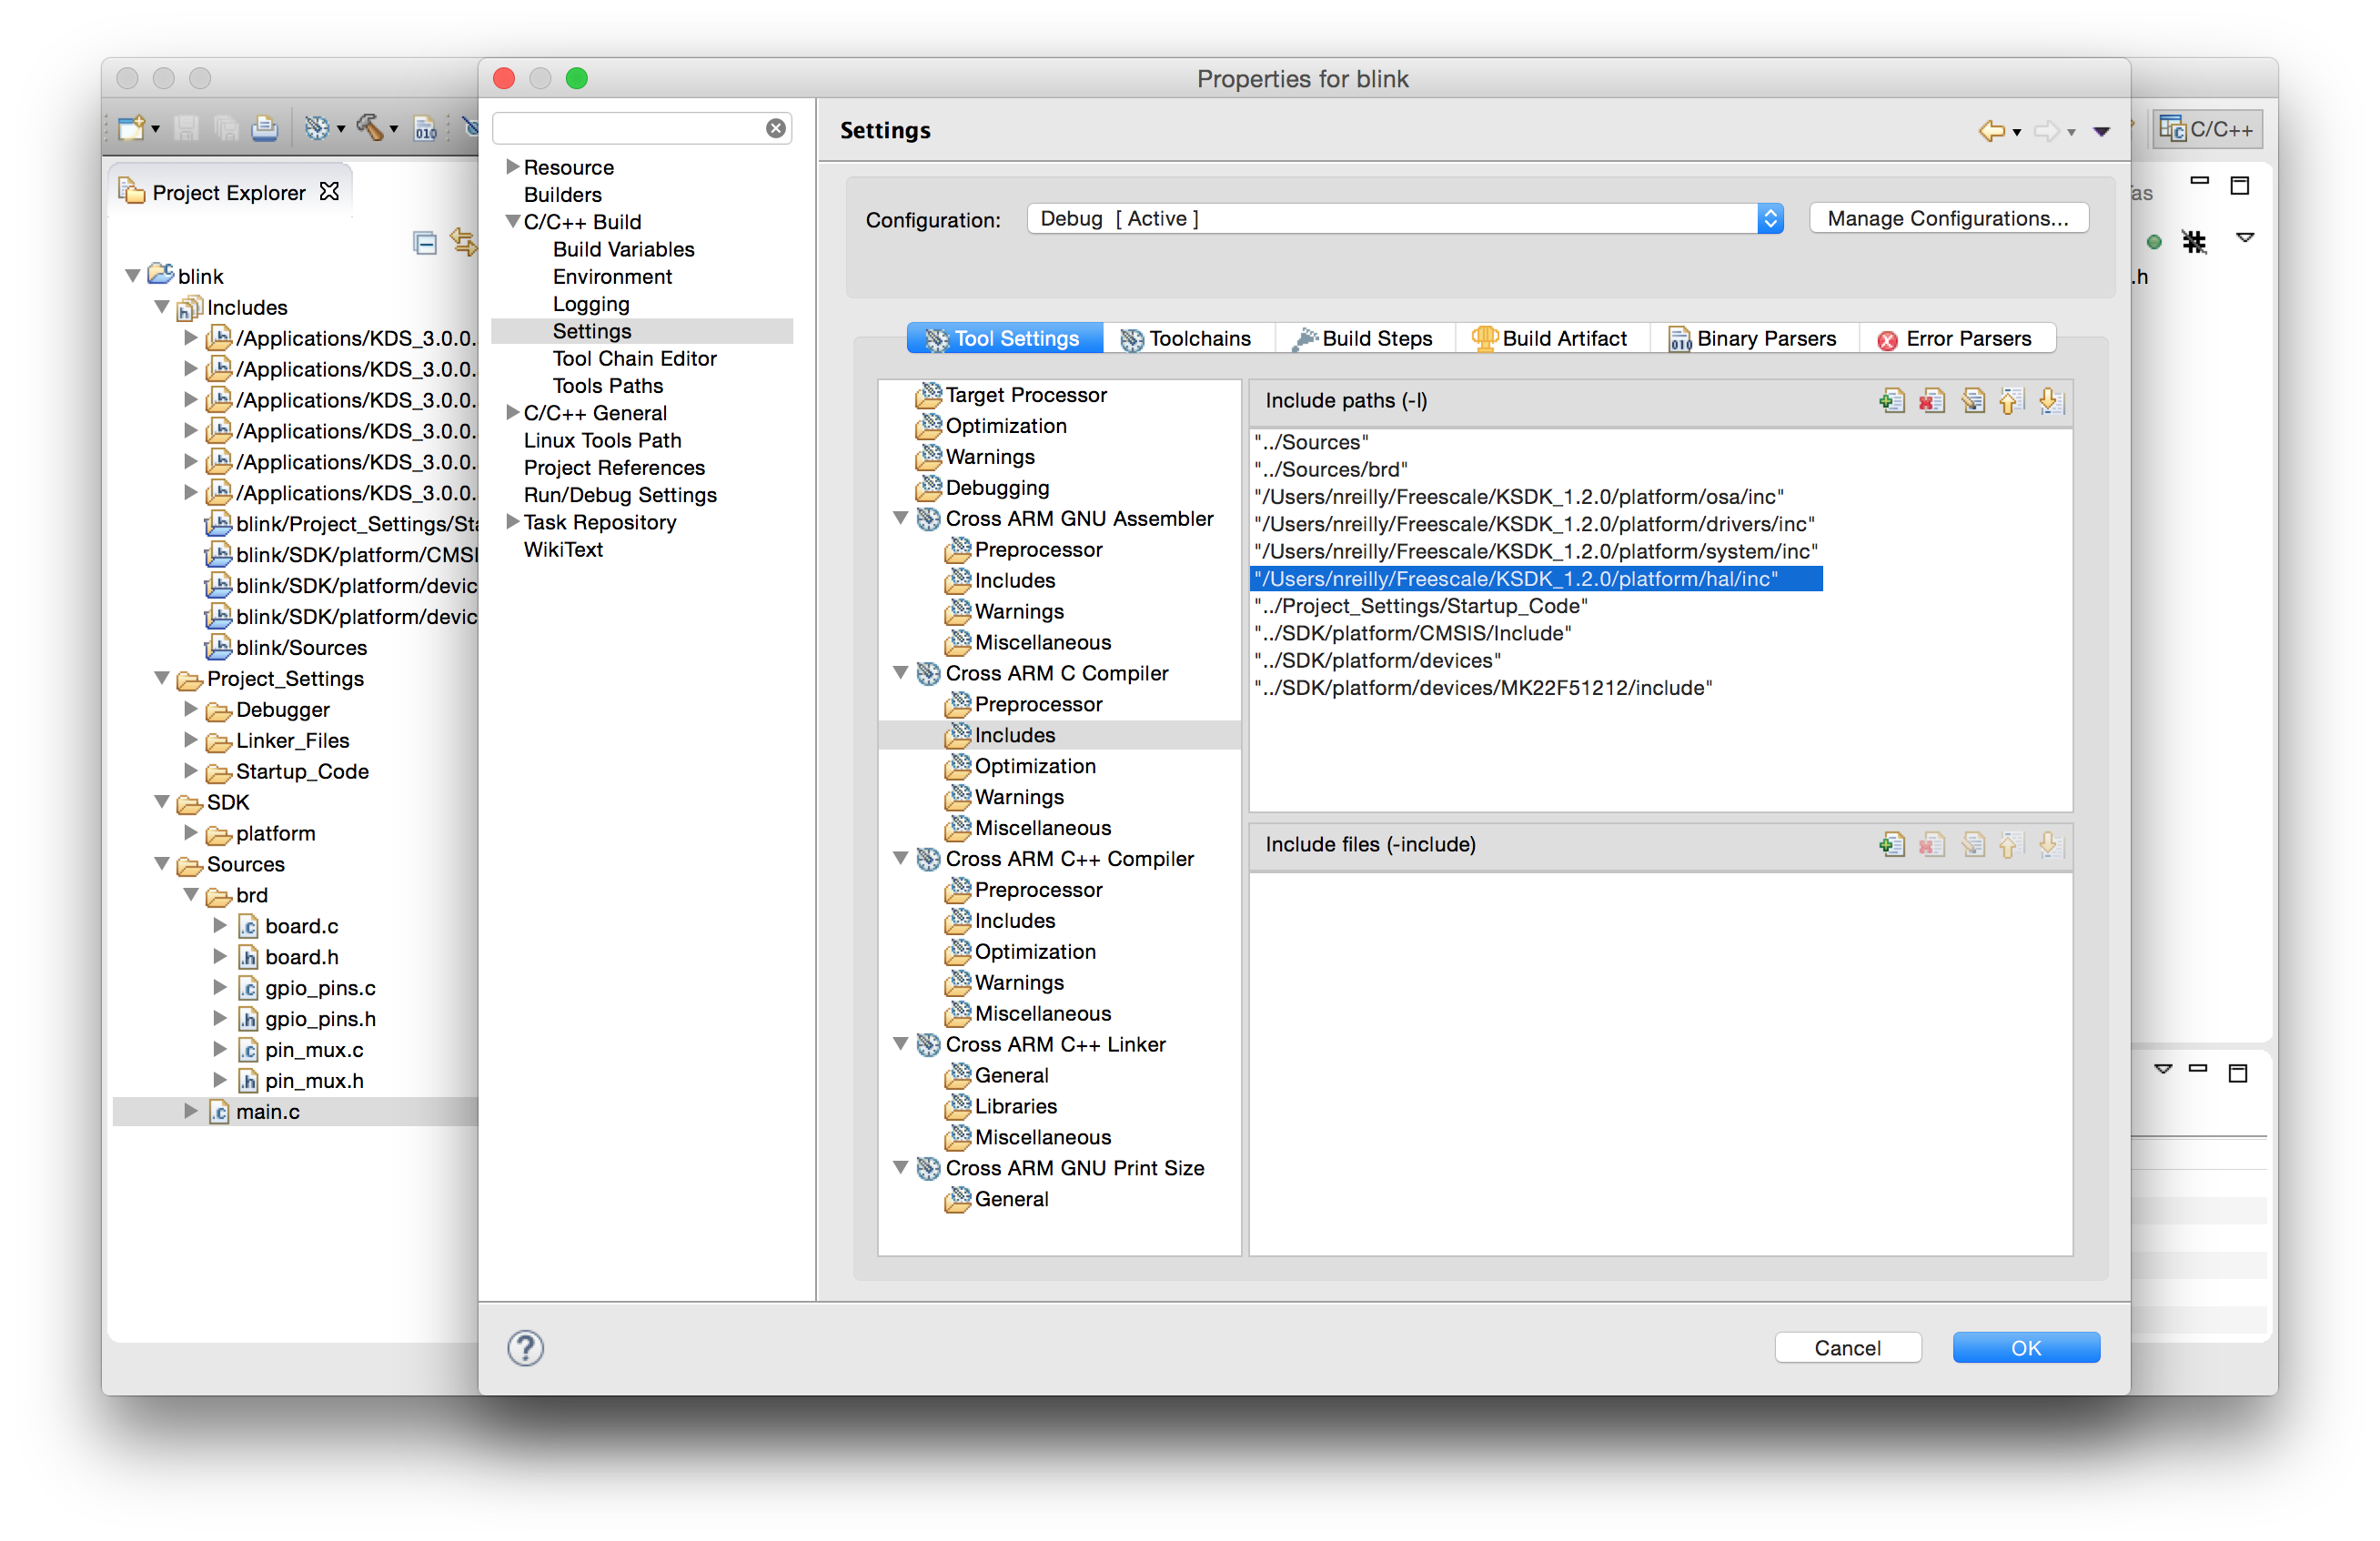
We're nearly ready to rock and roll! The last thing we need to do is to show Kinetis Studio what folders to look in when compiling. From the "Project" dropdown menu, select "Properties > C/C++ Build > Settings > Cross ARM C Compiler > Includes". You'll need to add a few paths to this window:
/KSDK_1.2.0/platform/drivers/inc
/KSDK_1.2.0/platform/hal/inc
/KSDK_1.2.0/platform/osa/inc
/KSDK_1.2.0/platform/system/inc
So that it ends up displaying the following:
Alright, one last thing to include! Head to the "Cross ARM C++ Linker > Libraries" window, and add "ksdk_platform" to the Libraries pane, and the path to your debug library in the "Library Search path" pane. Your debug library will be named "libsdk_platform.a", and should be located in a path similar to `/KSDK_1.2.0/lib/ksdk_platform_lib/kds/K22F51212/debug`. Don't see that file in the path you selected? That's because you haven't built the driver library yet! Make sure to head back to the beginning of this article and do that, or else your compiled code won't link!
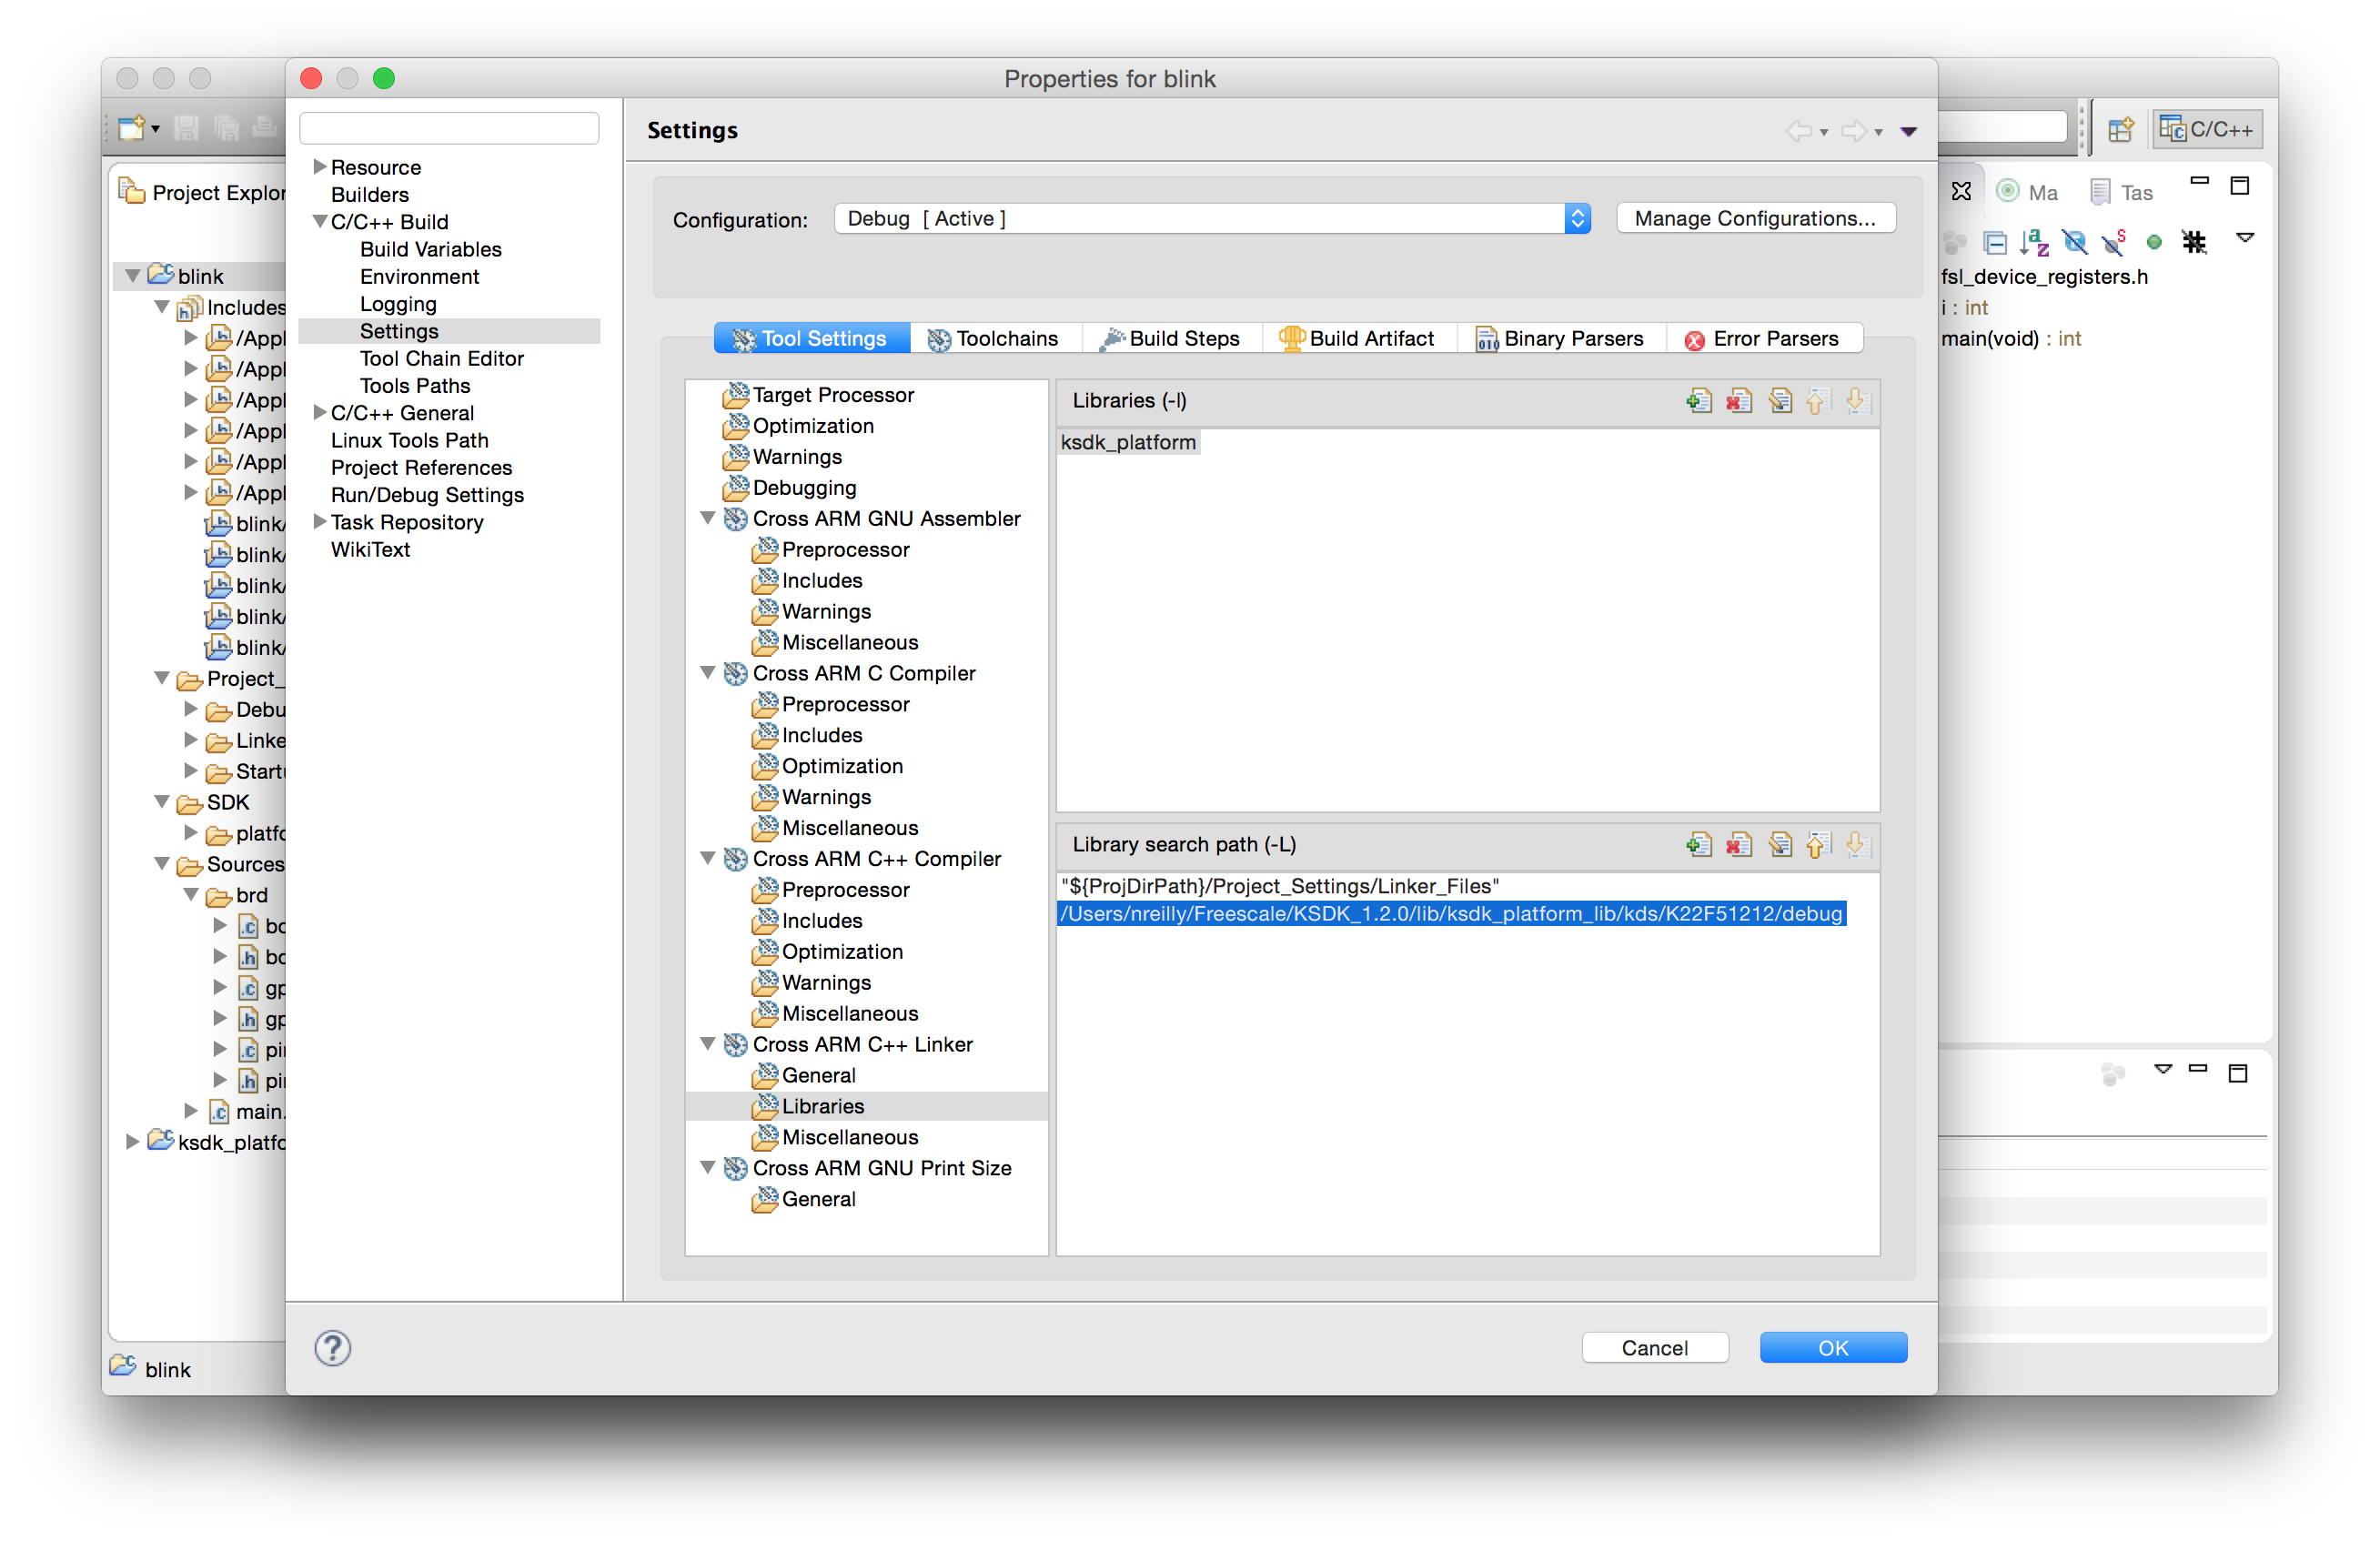
Big Warning Here: you will need to select the folder that corresponds to your processor. Since I'm using the FRDM-K22F, I chose the K22F51212 folder, as that's the onboard processor.
The "Hello World" of Hardware
Phew! We made it through all of that setup. Now it's on to the big dance! We're going to build a simple program here just to show that the toolchain is working. I'm referring to that good old standby of embedded engineers - blinking an LED!
#include "fsl_device_registers.h"
#include "board.h"
#include "pin_mux.h"
#include "fsl_clock_manager.h"
#include "fsl_debug_console.h"
#include


#define DELAY() do 				\
    	{					\
    		int32_t i;			\
    		for (i = 0; i < 0x1FFFFF; i++)	\
    		{				\
    			__asm("nop");		\
    		}				\
    	} while (0);				\

int main(void)
{
	// enable clocks for GPIO ports
	CLOCK_SYS_EnablePortClock(PORTA_IDX);
	CLOCK_SYS_EnablePortClock(PORTD_IDX);

	// initialize GPIO
	GPIO_DRV_Init(switchPins, ledPins);

	while(1)
	{
		GPIO_DRV_TogglePinOutput(BOARD_GPIO_LED_BLUE);
                DELAY();
	}

	// Never return; loop forever!
	return 0;
}
The first time we compile this guy, we'll need to set some default configurations. Click "Run > Debug Configurations" from the toolbar menu. I'll be running this as a Segger J-Link application, but it's really no different if you're running as a P&E Micro OpenSDA application. You just need to run through the debug configurations once, then click "Debug". This will take you to the "Debug" Perspective of Kinetis Design Studio. Click the "Start" button on the tool tray, and you should see your LED blinking happily away!
Wrapping Up/More Resources
Freescale has put a ton of good work into making development platforms like this available. Kinetis Design Suite and Kinetis SDK make a powerful combination for quick protoyping. Want to learn more? I'd highly recommend Erich Styger's site for more info on the Kinetis platform. Erich's tutorials are very thorough, and very useful!
